THIS GUIDE ENTRY discusses all the issues with head drop, along with the equipment we bought or acquired and the equipment I made at home.
Head drop
Head drop is a horrible symptom of ALS.
Dropped head syndrome (head drop)
All of our son’s neck and back muscles were destroyed by ALS in the last 8 to 12 months of his life. Without any supporting device, his chin just rested on his chest, or if he was accidentally tipped back a little too much, his head flopped completely backward as if he were looking at the ceiling. He was a rag doll.
We tried three different brands of head and neck supports for him, but they were all useless. The three head and neck supports we tried might be helpful for people with, let’s say, a neck injury or weak neck muscles, but not someone with head drop. I discuss them below.
Headmaster Collar
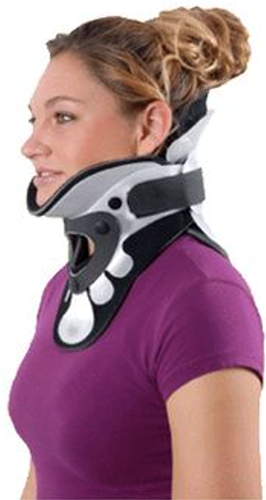
We bought a Headmaster Collar from Neck Solutions (see below), but it was useless. Don’t believe that smiling woman in their ads.The Headmaster
The collar consists of a stiff, but slightly flexible wire loop inside a cloth cover. The hype said the loop could be shaped to the wearer, but I found it very difficult to bend.
The collar is held in place behind the neck with a wide Velcro-like strap. As you can see in the picture, the entire weight of her head rests on the very tiny chin support. But that weight is transferred to the chest loop, which rests against her sternum, chest, and collarbones.
Big problem.
That chest loop pressed against our son’s sternum and collarbones, thereby causing bruises. He couldn’t move his head at all to use his eye chart and eye-tracker because his chin was resting on the chin support. Forget yawning (a severe symptom of ALS).
The chin support was too small and didn’t support his head well. The weight of his head caused his chin to slip off the wire loop inside the cloth cover of the chin support and fall inside the front end. We tried to shape the device to make his chin protrude slightly forward on the support, but it pressed against his throat. Even when we tried to tighten the two Velcro ends of the strap, the chin support started pressing against his throat. Bad news.
Also, he couldn’t open his mouth when his chin was resting on the so-called chin support. And due to head drop and gravity, the Headmaster allowed his head to tilt to his right side because there was no lateral support. Since the device couldn’t deal with a sideways head tilt, the chest loop always shifted to his left as his head tilted to the right, so we kept having to move the Headmaster back in place. It wouldn’t stay put.
Because the brace also kept collapsing due to the weight of his head, I had to tuck towels under his chin to buttress his head. The Headmaster does offer an optional add-on chin support piece, but we gave up on this brand. Also, we couldn’t use it in the shower because the cloth cover would absorb water and the wire would rust.
The cloth cover began wearing out after a short while. The stitching holding the Velcro onto the Headmaster began loosening.
Waste of money. Strike one.
Ottobock Cervical Immobilizer
We also bought the Ottobock device (see below). I tried it out myself. It was very comfortable for me, but it was nearly impossible to put on our son. For him to wear it, he had to sit upright, which he could not do.Optimal Head Support Brace
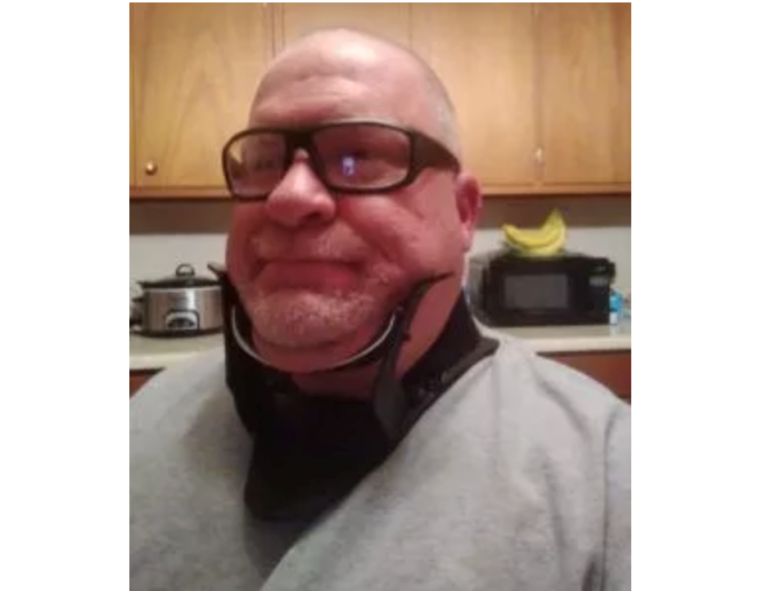
Then we got an Optimal Head Support Brace (see below). The photo shows the model we purchased worn by the inventor. All the pictures of the one we bought seem to have been scrubbed from the web, except the picture I found of him wearing it.
Optimal Head Support Brace (the model we purchased)
The photo below shows what his website claims is his “original” model. Obviously, this original was not his original. Since the “original original” model no longer exists, there’s no need to discuss it, other than it was unusable, difficult to adjust, and painful to wear (sharp corners). We returned it. The newer “original” didn’t exist when we bought the older “original,” so I can’t speak about it. Strike three.
Optimal Head Support Brace (replaced the original)
Hensinger Head Support
Our son also had a Hensinger Head Support. It was very hot and confining and tended to tilt his head slightly back. He tried it while being propped up in bed at the highest tilt of the bed, but he couldn’t put his head back against his pillow. It also prevented him reaching his call button. I think he wore it once.
Hensinger Head Support. Available at Danmar Products.
SafeCerv head supports
When I visited a neurologist in March 2023 for a personal medical issue, I also spoke about my son and the poor offerings for head drop issues. He recommended the SafeCerv device in the photo below, but this doctor obviously had no idea what an ALS victim’s day or night is like.SafeCerv Head Supports (two options)
Our son couldn’t have worn either of these. They require large, hard torso braces to hold the posts behind the patients. The models in the photo are standing up, but our son had to sit at all times during the day. The posts along the spines would have prevented him from leaning against the back of his wheelchair.
Because all the muscles in our son’s torso had been destroyed by ALS, he could not even sit upright. He had a terrible slouch, so the rigid post wouldn’t have been able to lay along his back. The tilt of the boy’s head on the right isn’t the natural tilt of someone’s head. Our son needed head support in bed (he had to sleep sitting up to enable breathing), and he couldn’t have lain down with this restraint on him.
HeadUp Collars
I just recently learned about a new kind of head support device from my niece, who makes prosthetic devices. Photos and a link are given below. She is familiar with head drop, a common problem with ALS sufferers.
The device is variously called “HeadUp Collar” or “Head Up Collar.” It is different from the other head and neck supports that my son used and that I have discussed in this blog. It is not nearly as bulky as some of the others and appears to allow some head movement. Also, it looks like it can be worn in bed and in a wheelchair without the device interfering.
My niece told me that it isn’t hot because it can breathe. A collection of struts can be attached to the collar. It is recommended that a professional custom-fit it to the patient.
To get one through insurance, you will need a prescription, including a PDAC code and a letter stating it is medically necessary. I imagine that other companies will begin putting their own versions of this online soon.
Drawing and parts diagram of the HeadUp Collar by TalarMade.
If anybody does get this, please critique it in the FB group. Here are some questions:
- Was it easy to get through insurance?
- Does it hold your head up?
- Does it continue to hold your head up through the day?
- Does it prevent your head from tipping left or right?
- Can you turn your head left or right if necessary?
- Is it comfortable?
- Can you wear it all day long?
- Can you wear it if you have a trache?
- Can it be worn in the shower?
- Can you wear it with masks from a ventilator, CPAP, BiPAP, nebulizer, cough assist?
- Was it easy to be fitted to you?
- Is it hot?
- How easy is it to be adjusted?
- Can you adjust it yourself?
- Do you have to buy more struts?
- Can you wear it while using an eye-gaze device?
- Can it be washed?
Suteki Head Support System
Someone asked on the FaceBook group “ALS—Patient and Caregiver tips for every day living” in early March 2025 whether anyone had tried any of the Suteki Head Support System models. The Suteki website (http://sutekidesigns.com/) mentioned three models, which I’ve summarized the the table below:


Please note: The Suteki idea is similar to our son’s ideas using either a baseball cap or a headband, but both of his were attached to his wheelchair’s headrest or to a support while in bed , not to a wearable device. His ideas worked, to an extent, because there was always uncomfortable pressure against his forehead all the time due to the headband and baseball cap pulling towards the rear while his head sagged forward, plus his head occasionally just dropped out from the cap or headband due to gravity. The Suteki idea is also a variation on the SafeCerv Head Support which I mentioned above.)
I emailed Suteki asking for further info on the HSS-3 because I thought that might be suitable for a non-ambulatory person.
Here is Suteki’s Reply #1 (asking questions of me):
“Could you provide a few details regarding the person who would be using the support system, as in, does this person have the ability to use their trunk and move their head side to side on their own? While seated, are they able to sit upright or do they need to be sitting in a more reclined position? (this is more regarding trunk control vs head/neck control, as I see that this product might be the link to enable them to sit upright vs reclined). Our support system uses rigid poles and hooks near the back of the head/neck, so if the person doesn’t have the ability to keep their trunk upright, it would be uncomfortable to rest on in a reclined position. Also, if you feel comfortable, would you mind sending a picture of how this person sits in their chair?
Thank you for reaching out,
Dayna Epperson
Suteki Designs”
My answers to Suteki’s questions in Reply #1:
“Our son had ALS (amyotrophic lateral sclerosis, AKA Lou Gehrig’s disease). One of the awful symptoms of his ALS was head drop, and it’s very common in ALS sufferers. He and I kept looking for devices to counter head drop. He passed away from ALS in 2021. Because I was so familiar with his head drop, I’m always looking at equipment that may benefit other head drop victims. As to our son, he was completely paralyzed, so no, he could NOT move his trunk or head at all. He could not sit upright without being supported laterally, because he would tip to the side. He could not recline at all because he would choke because his jawbone would press against his trachea. He had a terrible slouch because ALS destroyed all his muscles, so he could not sit up.”
I also sent a followup email asking the following:
“I thought about your questions further, and realized the question I should have asked is: Based on your questions regarding trunk and head movements, plus the sitting and positioning requirements, do you think that an ALS sufferer would not be able to use any of your head supports?” My question still is: Is the HSS-3 available for others?”
Suteki’s Reply #2:
“Hi Fred,
Our products were designed by and for our father. He had ALS and passed away 16 years after diagnosis. These tools helped keep him moving, more comfortable, and more autonomous so he wanted to provide them to other people with ALS. Our products are also helpful for many other cases of needed neck support.
As shown on the website, our first two models are best used for people when ambulatory.
We are currently experimenting with the design of the seated model HSS-3, but it would not be a comfortable support aid for a person needing to be reclined at all. However, if the person has sufficient trunk support this could be a helpful system. (Like sit in a chair at a table, not sit in an adaptive chair.)
We’re sorry to hear about your son, and admire your efforts to keep helping others with ALS. Let us know if we can be helpful in that endeavor.
Thanks,
Lindsay Rider
Suteki Designs”
This was the first head support manufacturer/supplier I’ve seen who is honest about the capabilities of their head support products.
Airline pillows
We tried a couple of airline pillows, the ones that wrap completely around your neck, but they were completely worthless. They were hot and too soft and squishy and pushed his head forward or pressed against his throat, offering no support. Strike four.
An adult’s head is probably 15 to 20 pounds, sort of like a bowling ball. Imagine trying to balance a bowling ball on a golf tee. Now try putting this setup onto something squishy like an airline pillow: end of pillow. Or try having the tip of the golf tee resting on your sternum or collarbones: painful. Now you’ve got a clear picture of our son’s predicament.
Head supports for a power chair
We found many head support devices online for his chair, but many of them made no sense. The following covers the ones we bought and tried.
Savant Headrest
A friend who lost her husband to ALS gave us a Savant Headrest (see photo below). Our son had to keep his head tilted slightly forward at all times to avoid choking, but I couldn’t adjust the bracket satisfactorily to allow that. As shown, no head movement is possible. He was very uncomfortable in it. The straps irritated him. The entire weight of his head rested against the forehead strap.
Savant Headrest (and stationary mount)
Our son then bought a very overpriced $500 part for the Savant called the Axion Rotating Wheelchair Headrest (see photo below). It was inserted between the back of the Savant Headrest, like the model is wearing, and the horizontal bracket attached to the Savant.
Axion Rotating Wheelchair Headrest
The Axion supposedly allowed the user to turn his or her head left to right. However, he had no muscles left in his neck because of head drop, so he couldn’t even turn his head at all. Think about this: Even when a non-disabled person turns his or her head from side to side, the head dips slightly in the direction you’re turning. The head does NOT stay in a level plane unless you’re trying to imitate a robot.
The Axion forced our son’s head to remain on a level plane while turning, so it wasn’t a natural motion. Jeremy tried it only once and then told me to donate it. Waste of a lot of money. Strike five.
Head support mounted on stander
Our son wanted to be able to stand up with head support. He tried for over a year, beginning in early 2020, to get a device called the Evolv Stander through Kessler Institute in West Orange, New Jersey. See photo below.
The pandemic slowed everything down, but incompetence at Kessler contributed to the delays too. By 2021, he had not stood up for almost three years.
After more than a year-long struggle (based partly on the Covid lockdown and partly because our son’s physical therapist at Kessler Institute left or changed departments without handing us over to a new physical therapist), Kessler and someone from NuMotion fitted him for the stander, and insurance covered it. By that time, our son had become so sick and weak that he used the stander only a couple of times. We had to use our ceiling lift to get him in and out of it. The transfer was very difficult and traumatic for him. We also had to monitor his blood pressure and heart rate while standing him up and sitting him down in the Stander.
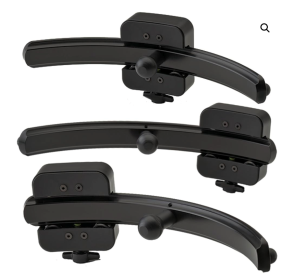
The stander came with the Stealth Products lateral head support seen in the two photos below.
Photo #1 below shows a front view of the head support mounted on our Evolv Stander. Notice the square mounting brackets on the lateral pads and the round mounting brackets on the rear ball joints. These are shown in side view in Photo #2 for more detail.

Photo #2 below shows a side view of the same head support on the Evolv Stander. Every positioning adjustment of the laterals and of the headrest mount (up, down, forwards, backwards, inwards, outwards, clockwise, counterclockwise, etc.) was extremely difficult because there were so many adjustment screws everywhere, many of which I’ve marked in Photo #2 with the word “here”. (I think I had counted between 20 – 30 screws.) Some parts had 4 screws each! And two different Allen wrenches had to on hand to loosen and tighten all these set screws. It would have been more intelligent having simple adjustment knobs.

Because our son couldn’t use the Evolv Stander, I thought it would be worthwhile removing the Stealth headrest from the stander and putting it on his wheelchair. However, Photo #2 above shows (in the lower right-hand corner) that the vertical mounting tube was round, but I needed a square tube to match the corresponding headrest mounting tube on our son’s powerchair. See Photo #3 below. All I needed was a square mount to replace the round one. Yeah, right.

I first tried buying a complete Stealth headrest for his Quantum Edge 3 for cash, but they wouldn’t sell it to me because I wasn’t an approved Durable Medial Equipment vendor. I then tried buying just the parts from Stealth Products, but the bastards wouldn’t sell them to me, either. I was told I had to go through Kessler, but neither Kessler nor their vendor, NuMotion, would return my calls. Strike six.
Homemade head supports
Out of desperation, I built my own head supports. With some spare parts and ingenuity, I managed to come up with ways to ease Jeremy’s discomfort.Lateral head support for a wheelchair
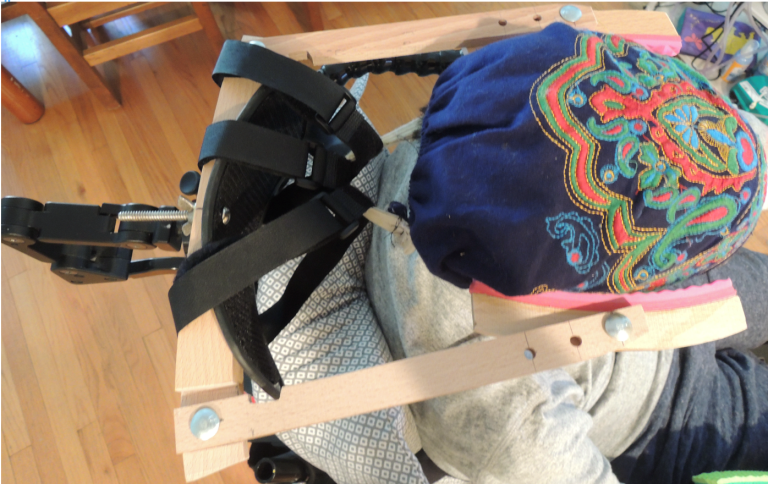
I used wood from an old kitchen chair, carriage bolts, wing nuts, and rubber padding I had on hand to create a lateral head support. Total cost: $0.00. The photo below shows a spare head support (the black part) with my homemade lateral supports (the wooden, padded parts) added on. The lateral supports consisted of left and right wooden arms attached to a wooden cross piece, which, in turn, was attached to the back of the headrest (the cross piece is just visible behind the headrest).
My homemade lateral head support attached to an existing headrest
The two arms could be swung inward and outward independently, and they were tightened with wing nuts on the rear carriage bolts where they connected to the cross piece. Likewise, the left and right padded lateral supports (the pink pads were from rubber floor tiles) could be positioned and pivoted independently and were also tightened with wing nuts on the forward carriage bolts. The whole device could be raised and lowered.
Our son could lean to either side, and the independently adjustable arms could be repositioned to his comfort.
The photo below shows the whole assembly removed from the power chair and lying on the floor. It had two subsequently added improvements: the turnbuckles and their pegs. We discovered that when we traveled in our van while our son was in his power chair, the vibrations caused his head to bump into the two padded pieces and spread both outward because we couldn’t tighten the wing nuts enough.
To stop the laterals from spreading apart, I added some pegs and the turnbuckles so we could position the two arms and tighten the turnbuckles to prevent the arms from spreading. This worked very well.
My homemade lateral head support with turnbuckles to prevent spreading
Head support for head drop
The discussion above included only lateral head support, not head drop, because lateral issues appeared a little before head drop did. Our son came up with an excellent idea (tethering) for supporting his head on the wheelchair (this idea also worked when he was in bed—discussed below). The tethering idea worked, but there were drawbacks. See the photo below.
Homemade lateral head support with Velcro strapped to bandana to prevent head drop
Jeremy had a bandanna with a non-stretchable band at the back. He also had a typical baseball cap (one with a non-stretchable adjustable band at the back). He suggested we tether the bandanna’s or the hat’s adjustment bands to the headrest of his power chair with two or three adjustable Velcro straps. By tightening or loosening the straps, we could adjust the tilt of his head forward or backward until he liked the position.
We had to trade with several other kinds of headwear ( headbands, bandannas, surgeon’s caps, soft caps) because each one became uncomfortable after a while. All of them had to be cushioned. The pressure against his forehead was terrible. (Try having 15 to 20 pounds pressing against your forehead all day and all night).
The photo shows our son wearing a bandanna that is tethered to my homemade lateral support’s headrest. Because of his weakened muscles, he had developed a terrible slouch, so there was always a very large gap between the back of his head and the headrest. I couldn’t easily adjust the head rest itself forward more to decrease the gap.
Heads support while on the toilet
Our son also had a good idea to keep his head up while he was on the toilet. We used our SureHands ceiling lift (see photo below). After he was placed on the toilet with this device, we removed the two U-shaped metal thigh supports, placed the lift frame around him so the two large armpit supports gently hugged his torso, and then looped the upper black strap you see in the photo under his chin. By adjusting the strap length, we could tilt his head.
SureHands Lift with chin strap for head support on toilet
It was so comfortable that he often fell asleep there. By the way, the tiny handheld remote controller you see was $800 to replace! It’s just a radio transmitter!
Head support in the shower
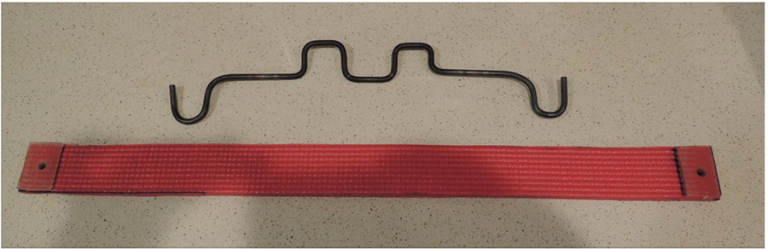
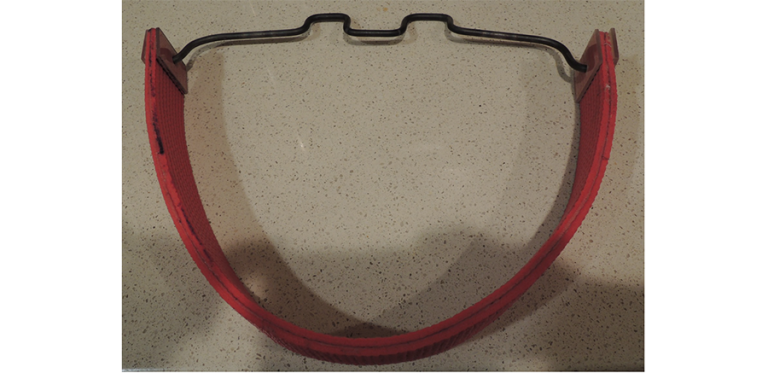
When our son developed head drop, we had to figure out a way of supporting his head while he was in a shower chair. We couldn’t tilt the chair back because he would have choked. His head had to remain angled slightly forward. We tried wrapping a large elastic gym exercise band horizontally around the headrest and across his forehead, but that never worked. We tried cloth headbands tethered with Velcro straps to the head rest, but the cloth got soaked, and because of the shape of the headrest, the straps kept sliding off the headrest. We didn’t bother trying any of the commercial supports I mention above. I built my own waterproof head restraint, starting with a short piece of my wife’s yoga mat, a 1/8-inch diameter steel rod, and some Velcro straps. The mat was waterproof and pretty soft, so it was a good material for a headband that would get really wet. I cut two narrow strips from the mat and glued them together face-to-face with contact cement as you see in the first photo below. Next, I glued small square pieces of Lexan (a very tough plastic) to both sides of both ends of the pink strap and drilled one hole through the middle of each one. These Lexan pieces were used to fortify the holes against tearing. I bent the rod with the help of a blowtorch, pliers, and a bench vise into the weird shape you see in the same photo. I thought the rod would rust in the shower, but I wiped it down after each shower and it never rusted. The two pieces went together like you see in the second photo down.
Homemade waterproof shower head support (not assembled)
Homemade waterproof shower head support (assembled)
To use this restraint, we placed our son in the shower chair while we held his head steady and slipped the assembled restraint over his head and against his forehead. Then we wrapped two Velcro straps around the headrest and through the metal piece, as seen in the photo below.
I also put a third horizontal Velcro strap across the two vertical ones just to keep the vertical ones from slipping off the headrest. There was no lateral support, so his head did tilt left and right, but he was only in the shower about 15 minutes. When we wanted to wash our son’s forehead or hair, we just slipped the headband off for a few minutes, manually held his head up and shampooed. It wasn’t perfect, but it helped.
Homemade waterproof shower head support in use
(Velcro straps attached it to the headrest)
Head supports in bed
Providing support for both head drop and lateral head support in bed was the most difficult task of all. Jeremy had to sleep almost sitting up to avoid choking, but his head had to lean slightly forward at the same time. The top of his mechanical bed was tilted almost as high as it could go, but we needed an even steeper incline than the bed could provide.
We tried the Headmaster and the Otto Bock supports on him in bed, but they were useless.
One of our first attempts dealing with head drop in bed was with the restraint shown below: a child’s padded head restraint we bought from Etsy. The padded part went across Jeremy’s forehead, while the black strap (on the right) was connected by a simple coat hanger that I opened and bent over the inclined top of the bed and hooked directly onto the metal bed frame.
We added a Velcro strap across the top of the padded part that went over the top of our son’s head to prevent the restraint from slipping down onto his face. (The loop on the right is described below.)
Cushioned headband (adjustable straps added across the top and on band at right)
The box spring and the bed frame were adjustable with the remote, and that was how we adjusted the position of his head. We also kept having to bend the coat hanger to make it shorter or longer to achieve the correct position of our son’s head. This was a pain in the neck.
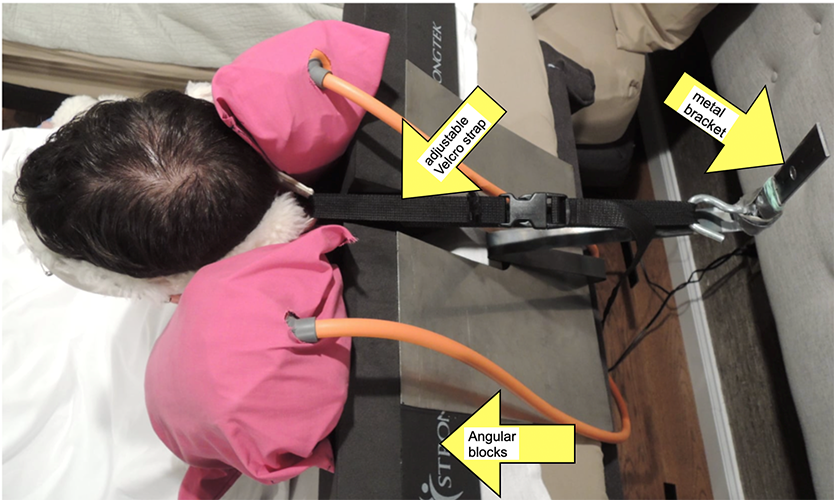
I replaced the flimsy coat hanger with a ½-inch wide piece of soft iron bar, bent on one end so I could hook it to a short adjustable strap that looped through the black strap coming from the head restraint. You can just see the top end of the metal piece at the right side of the photo below. That’s me in the picture.
The other end of the metal bar hooked directly to the bed frame. Our son’s head angle could be adjusted with the short strap. The weight of his head leaning forward prevented the metal hook from coming off the bed frame.
I sat in Jeremy’s bed for the photo below in the same position that our son slept in. Obviously, I was using my neck muscles to prevent my head from flopping left and right.
I adjusted the small strap (it just crests the top edge of the mattress) and the angle of the mechanical bed to allow our son’s head to lean forward slightly so the whole assembly would be taut. He had pillows and other soft things around his head to give him lateral support and could usually sleep through the night.
Me wearing the cushioned headband attached to the bracket and bed frame.
Things became more complicated as his condition worsened, so I kept having to change the design and build better devices. The head restraint in the photo above with the metal bracket assembly didn’t provide any lateral support. Our son’s head just flopped to either side (usually to his right). He had no strength in his neck muscles to position his head and keep facing forward.
Every night when we got him ready for bed, we put the headband–metal bracket assembly on his head and then spent a long time rolling up small towels into two larger diameter rolls and positioning one roll on each side of his head to give lateral support. The two rolls formed a soft “valley” that kept his head in position. The towels needed adjusting all night because gravity kept pulling them downward.
Getting them just right for our son was difficult. He also told us he felt trapped between the two rolls of towels. I wanted something easier to use.
I looked for some kind of stuffed or inflatable cushions online, but struck out. Then I looked for something inflatable like the pressure cuffs nurses and doctors use to take your blood pressure, but the shapes weren’t right.
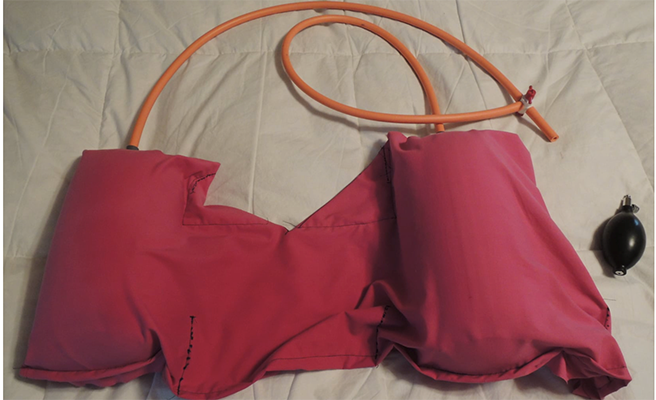
Because I couldn’t find what I wanted, I designed something myself: two inflatable bladders, one for each side of our son’s head, that gave the same sizes and shapes as the two large rolled towel we kept forming every night. I wanted to be able to inflate or deflate them until he was comfortable.
I found Perma-Type Rubber, a company that custom-makes inflatable things. I sent a sketch of my design to them with dimensions. The guy I spoke to was very helpful and came up with some good suggestions to add to my idea.
The result was a pair of cylindrical rubber balloons that I could inflate to five to six inches in diameter, just like the size of the towel rolls.
Inflatable bladders I designed for lateral head support in bed
Each balloon came with a long rubber hose. I also bought a squeeze bulb like the ones attached to pressure cuffs. The tiny red-and-white object is a three-way Teflon valve that allowed me to connect both balloons to the squeeze bulb simultaneously, inflate them, turn the three-way 45 degrees, and remove the bulb with no leakage.
The photo below shows the two balloons inflated and inside a pillowcase with the two hoses protruding from holes that I cut in the pillowcase. The pillowcase kept the bladders in place. The two hoses hung off the top end of the mattress.
Inflated bladders inside a pillowcase (three-way valve closed and squeeze bulb removed)
I put the whole assembly on the inclined part of our son’s bed (see photo below). By tucking the open end of the pillowcase under the bladder on his left, the bladders remained in position all night. We covered the whole thing with some towels for cushioning. It held perfectly and it made sleeping easy for him. There was also just enough space on either side of his head for him to move his cheek to touch his call button (not shown).
Jeremy in bed with lateral head supports in pillowcases plus Velcro straps attached from his cushioned headband to the steel bracket tucked under the mattress
The next issue was tilting his head just right to keep his airway open, plus maintaining the position all night. It was too difficult to adjust the Velcro strap seen in the photo above because his head was heavy for a direct pull.
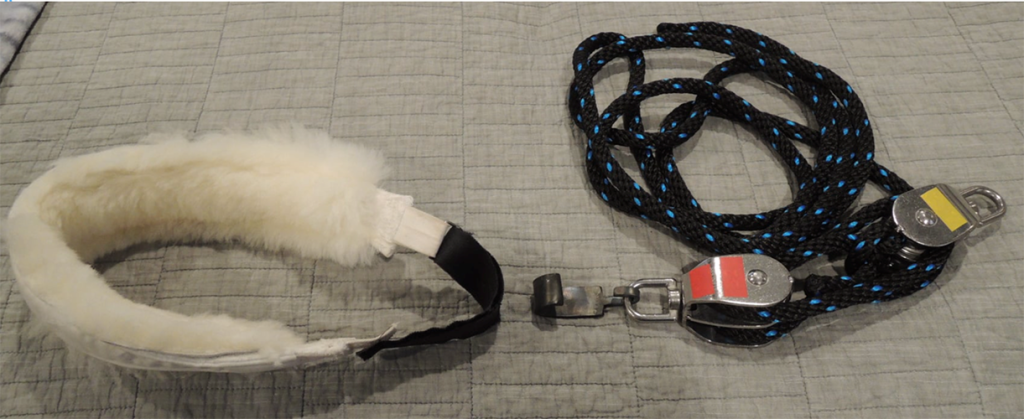
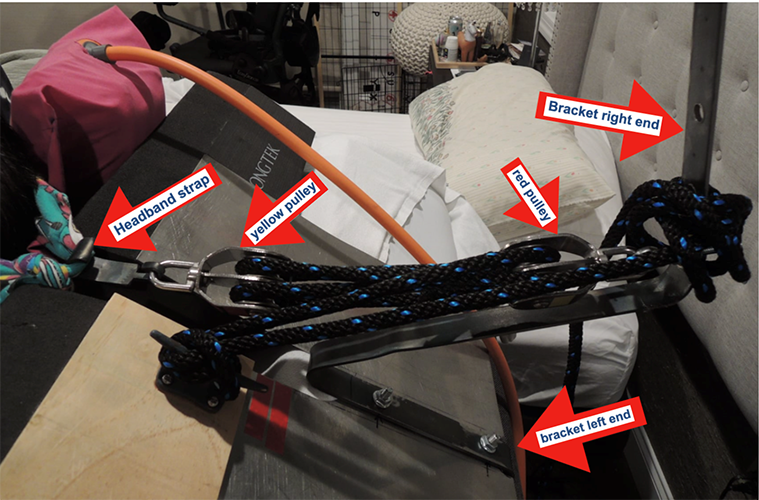
I bought a pair of pulleys to form what’s called a “block and tackle” with a mechanical advantage of four (see the red- and yellow-taped objects in the photo below), plus some strong rope. The number four means that the weight of his head felt like it was only a quarter of its real weight, so it was very easy to adjust his head position.
I made the small metal hook that connected the red pulley to the headband. I connected the yellow pulley to a metal bracket that was stationary (not seen in this picture). The colors told us which pulley went to the headband and which to the metal bracket.
Block and tackle assembly replaced the Velcro straps for easier head tilting
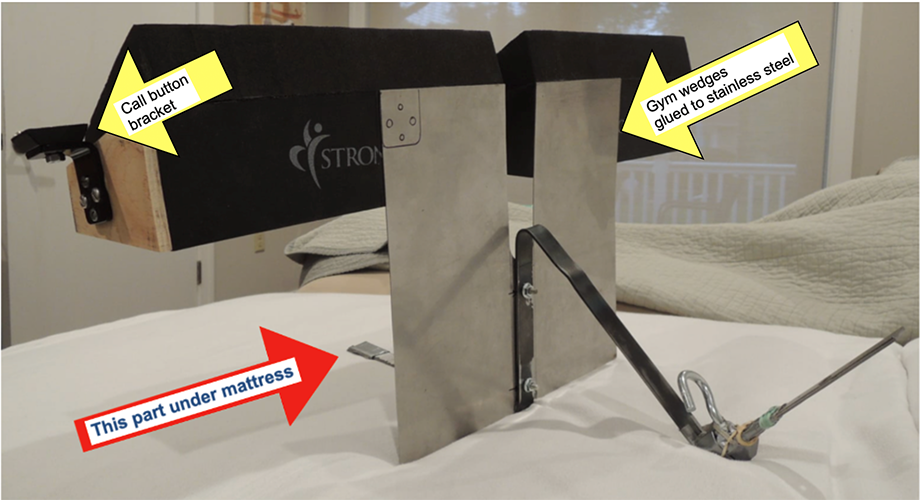
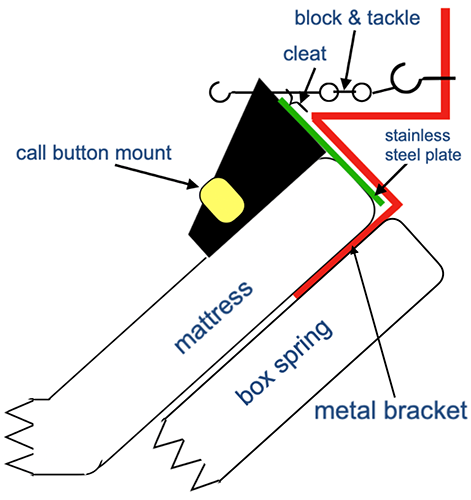
The metal bracket I mentioned above was mounted on a complicated device I built from some gym wedges, sheet metal, wood pieces and other necessary parts. See the following photos.
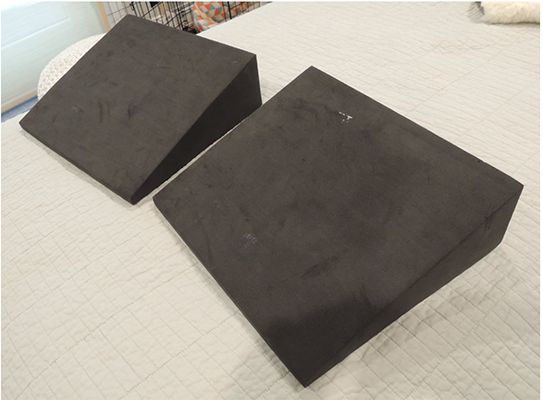
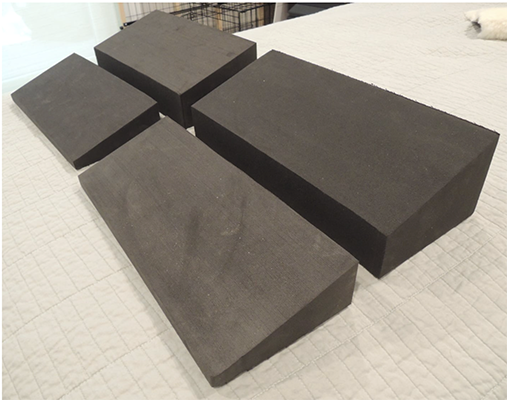
Gym wedges
The wedges were cut as shown below and then the two parts were glued to form a much steeper wedge that our son could lean against once it was placed on the inclined part of his mattress.
Gym wedges cut into smaller pieces
The photo below shows the wedges, metal bracket, sheet metal, and wooden pieces assembled. This device was placed at the very top edge of our son’s mattress with the left end of the metal bracket tucked under the mattress. I’ll explain the wooden parts below. Other parts were added as necessary.
Gym wedges, sheet metal, metal brackets, wood, and call switch mount
The pulley assembly was placed as shown below. Our son’s head could now be easily tilted either forward or backward as he needed.
Pulley assembly in place, attached between the headband (left) and the bracket (right)
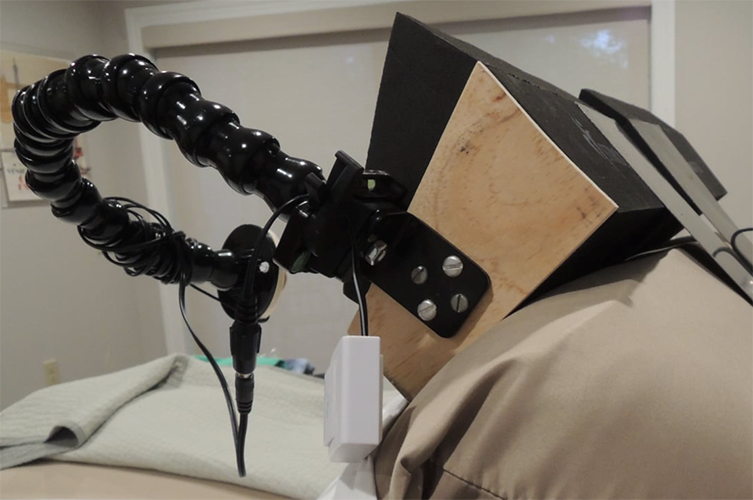
Jeremy also needed a call button, so I mounted one, as shown on both sides of the head support. See below.
Call switch and removable gooseneck on wooden mount (white object is the transmitter)
The schematic below shows a side view of the head support device I built for my son. The various parts are not to scale, but you can see how everything is mounted. The cleat was added to secure the free end of the rope in the block and tackle.
Schematic of head support
Head drop in the hospital
When Jeremy was in the hospital for breathing difficulties and a tracheostomy in October 2021, one of our biggest problems was his head drop. The long, upright headrests of the hospital beds extended toward the ceiling quite far above our son’s head.
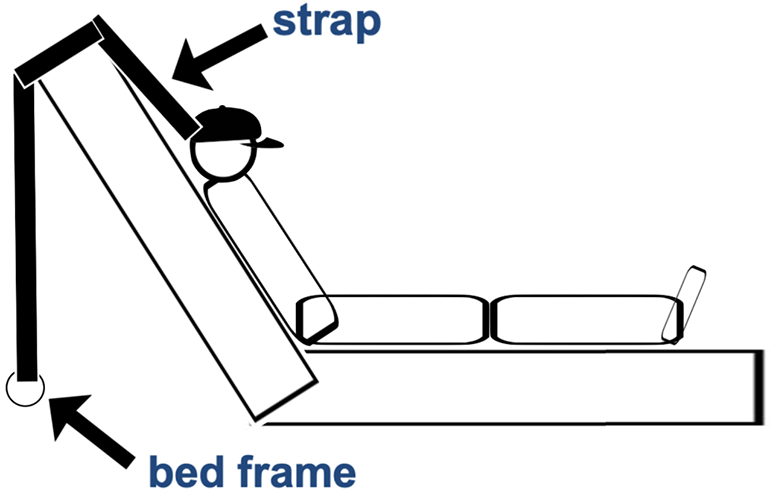
Obviously, the homemade devices I built were of no use in the hospital setting. He had to wear his bandanna the whole time, and we had to tie the band at the back of the bandanna over the top of the headrest to the metal frames of the bed with very long adjustable straps. Obviously, the strap kept pulling the bandanna and hat upward. It was very difficult.
Hospital bed and strap arrangement to hold our son’s head up